TextArt Tool
![]() This tool allows you to add
plain and decorative text to your images. It acts as a launching pad for the TextArt engine.
Before you can input text, you need to select a region for the text to go into. You do this by clicking a start
and end point. You then confirm this selection by right-clicking or pressing Enter.
This tool allows you to add
plain and decorative text to your images. It acts as a launching pad for the TextArt engine.
Before you can input text, you need to select a region for the text to go into. You do this by clicking a start
and end point. You then confirm this selection by right-clicking or pressing Enter.
Once you select the region to apply text to, a new layer containing the text will be created and you will be presented with a dialog box where you can change several parameters; this is the TextArt editor.
The TextArt Engine
TextArt is the decorative text engine used by Chasys Photo. TextArt supports texturing, selectable styling and arbitrary rotation, all fully re-editable even after the application has been closed and reopened. TextArt allows you to work with text within Chasys Photo as you would in an advanced word processor, giving you unmatched flexibility and freedom. TextArt also applies text anti-aliasing to the rendered text; this is done by applying a series of image processing operations (one of which is super-sampling) on the text to improve its appearance. Anti-aliasing can greatly improve the appearance of text, especially at small font sizes, therefore allowing you to work at lower resolutions.
 |
 |
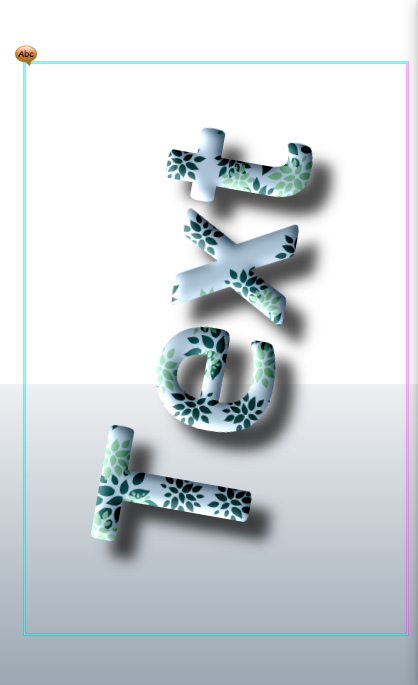
The TextArt Editor
This is the interface through which you manage and edit text in Chasys Photo. Shown in the same clip is sample text being rendered using the interface. The text is being rendered at an angle with a pattern fill, lighting effects to give it a 3D look and a drop-shadow to make it look like it is floating above the surface.
 |
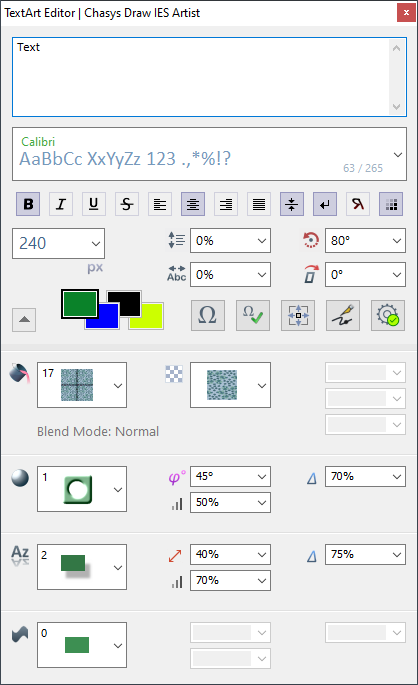 |
The interface looks complicated, but it’s actually very simple once you understand it. At the top you have the area for entering text, below which you have the drop-down combo for the font you intend to use. Below that is a row of buttons for basic text formatting (bold, italics, underline, strikeout, left-align, center, right-align, justify, vertical-centering, word-break, and anti-aliasing). Below these, you have combos for text size, text rotation angle, line spacing, character spacing and skew angle, and below them, you have buttons for insert symbol, replace with symbols, fit to text, text to path, and set as default. They all do exactly what you’d expect them to do.
To the left of these buttons are four boxes that show the four text colors. The selected text color, which is indicated by a bold border around it (in this case, the first color, black), is the color that is currently selected for modification and can be changed via the color picker. The color picker will be restored to its previous state when the TextArt editor is closed. You can select any other text color by simply clicking on it.
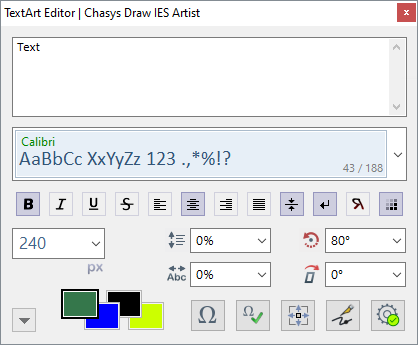
The lower half of the dialog box, which can be collapsed as shown above, is a bit more complicated. It is divided into three sections with sets of combo-boxes with various symbols next to them. The first section defines the fill-type, which controls how the text is painted, e.g. with a flat color, a gradient, or even a pattern such as the “grandma’s flowers” in the sample above (see Watermark Tutorial for another example). The smaller combo-boxes next to the main combo-box set the parameters of the fill-style, such as intensity, and the second large combo-box sets the texture or pattern to use if required. The second section defines the lighting-type, which controls the lighting effects that are applied to the fill (paint) of the text. In the example above, the lighting style is an embossed look with the light source at the top left corner of the image. The third section sets the effect-type, which determines the post-processing applied to the final text, such as adding a drop-shadow or a reflection. The final section sets the distort-type, which determines the warping or distortion applied to the text, such as bending it into a wavy line or an arch.
Generally, text is filled using the first two text colors as per the fill-type, and the last two text colors are used for rendering effects such as halo or outer borders. When importing text generated using an older version of TextArt with just two text colors, the system will attempt to automatically determine which colors should be used as the additional text colors.
Special Symbols and Extended/UNICODE Characters
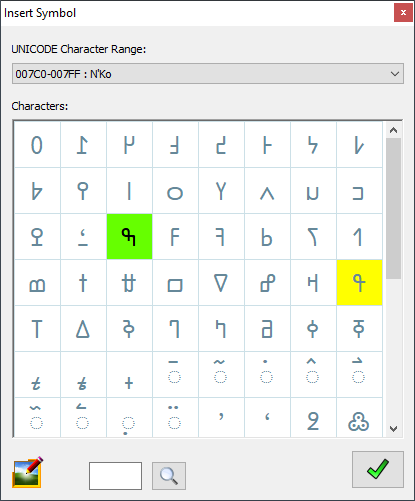
Chasys Photo supports the full set of UNICODE characters and will render any character that is supported by the currently selected font, including special characters. You may insert special characters such as the µ or £ sign by clicking the Symbol button (first button from the lower left corner). Just scroll down till you find the symbol you want then click the OK button to use it. If you already have the character you are looking for copied to the clipboard, you may such for in in the UNICODE character-set using the search button; this may be useful for finding related characters.
The Replace with Symbols function automatically replaces text sequences like (C) and (TM) as with symbols like © and ™ where applicable. The engine uses an algorithm that takes into account the sequences as well as the preceding and following characters to make decisions on when it’ appropriate to make a replacement; in some cases, whitespace will be required before or after a sequence to prevent erroneous replacements. The table below lists some of the replacesments that will be made:
| Mapping for “Replace with Symbols” | |||||||||||
|---|---|---|---|---|---|---|---|---|---|---|---|
| (C) | © | (R) | ® | (TM) | ™ | (SM) | ℠ | c/o | ℅ | -- | – |
| +/- | ± | 1/4 | ¼ | 1/2 | ½ | 3/4 | ¾ | 1/3 | ⅓ | 2/3 | ⅔ |
| 1/5 | ⅕ | 2/5 | ⅖ | 3/5 | ⅗ | 4/5 | ⅘ | 1/6 | ⅙ | 5/6 | ⅚ |
| 1/8 | ⅛ | 3/8 | ⅜ | 5/8 | ⅝ | 7/8 | ⅞ | 'C | °C | 'F | °F |
| ^2 | ² | ^3 | ³ | 1st | 1ˢᵗ | 2nd | 2ⁿᵈ | 3rd | 3ʳᵈ | 4th - 9th | 4ᵗʰ - 9ᵗʰ |
| * (at line start) | • | <3 | ♥ | :-) | ☺ | :-( | ☹ | tel: | ☎ | ||
Some fonts may not include the glyphs for some of the symbols since fonts are not required to support all possible characters. It is therefore important to select a font that includes all the characters you’d like to use. Some characters such as © and ™ are supported by almost all fonts while others such as ☹ and ℠ may be missing from some commonly used fonts. If Chasys Photo knows that the current font doesn’t support the ideal symbol but it supports a non-optimal alternative, it will use the alternative. Otherwise, the symbol will be inserted anyway.
Please consult your preferred font repository for more information on glyphs supported by various fonts.