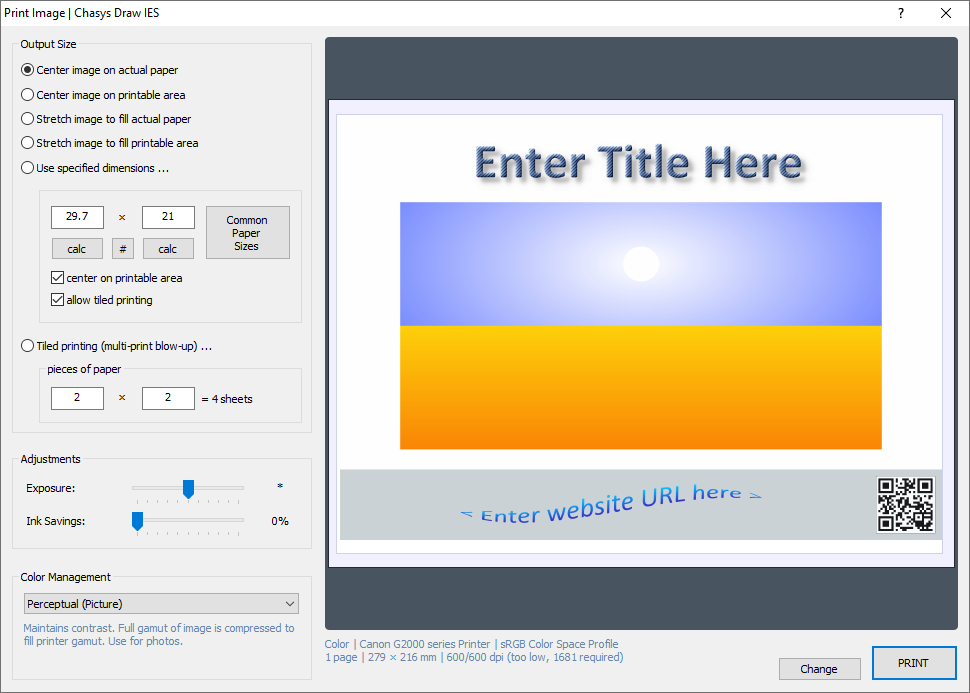
The Precision Printer is the interface through which you control
printing in Chasys Photo Editor. It allows you to select a printer, printing
preferences and the printing mode, which dictates how the image will be fitted
onto the paper, and how many pages will be used per image.
It shows you a preview created using information collected from
your printer to give you some idea of what the final work will look like.
Printing Modes
Currently, Chasys Photo Editor supports the following
printing modes:
Mode
Details
Center image on actual paper
The software attempts to center the image on the physical page
(paper). This is the default if the image does not have a valid Physical Dimensions attachment.
Center image on printable area
The software will center the image on the printable area (most
printers cannot cover the whole surface of the paper).
Stretch image to fill actual paper
The image is stretched to cover the whole physical page
indiscriminately. The original aspect ratio is ignored, therefore, the image may
be distorted.
Parts of the image that fall outside the printable area will not be printed.
Stretch image to fill printable area
The image is stretched to cover the whole printable area
indiscriminately. The original aspect ratio is ignored, therefore, the image may
be distorted.
Use specified dimensions
The software attempts to make sure that the final printout’s
dimensions are equal to the specified width and height to within an accuracy of
a fraction of a millimeter.
This mode is especially useful where prints must
have a specified exact size, for example 120mm by 239mm for CD-ROM jewel-case
inserts.
The Common Paper Sizes button brings up a list of standard sizes
that you can use as presets.
This is the default if the image has a valid Physical Dimensions attachment.
If the dimenstions are significantly smaller than the paper size, you have the option to print multiple copies per sheet, also known as step and repeat printing. If you allow it, the software will rotate the image if calculates that doing so will allow more copies to fit the page.
Tiled printing (multi-print blow-up)
In this mode, you can to specify how many pages should used per print; the
image is stretched and split as necessary to cover all the sheets. This allows
you to print at any size using a normal printer. See multi-print blow-up for a more detailed explanation.
Precision Printing
Precision Printing allows you to make prints of a custom size
accurate to a fraction of a millimeter. To use Precision Printing, you set
the printing mode to "Use These Dimensions...". You then take the measurements
of the target (for example, the measurements of the jewel case if you are
designing a CD label) which you specify in millimeters. Chasys Photo will
then do the rest. Note that all measurements are in millimeters, not inches.
The maximum accuracy attainable using
Precision Printing is limited by your printer. Usually, this will be enough for
most purposes, so you need not worry about it.
Multi-print Blow-up
Have you ever wanted to print something huge - say, A2 - and
couldn't because the largest paper your printer could take was A4? This
could just be the solution to your predicament. Using multi-print blow-up,
Chasys Photo can split the image into pieces which it then prints
separately. You can then join these pieces by gluing them together to get
your huge poster.
Posters of any size can be realized easily using ordinary A4
paper, even if "any size" for you means 4 by 3 meters ( a bill-board ) - if
your printer can take the punishment, that is.
If you intend to do large blow-ups, it
would not be such a bad idea to work at 3 mega-pixels or more - more paper means
more dots to print. Having a substantial amount of RAM (at least 1 GB) would
also be well advised. To keep your system happy, make sure your system drive has
at least 2 GB of free space and keep it de-fragmented (Windows needs up to 560
MB to spool a 2x2 blow-up at 600 dpi, and four times that for a 4x4 blow-up).
Or just disable spooling -- Chasys Photo doesn’t mind.
Color Processing
Gamma:
When printing images, Image Color Matching (ICM) is performed. In some
cases, you may want the print to be lighter or darker than what ICM generated.
Chasys Photo Editor allows you to correct this by adjusting gamma if you wish
to do so.
Ink Savings:
Very deep subtractive color levels consume a lot of ink, while causing very
little perceptible color variation. This ink is, therefore, mostly wasted.
Chasys Photo Editor can help you save ink by limiting the said color levels.
The effect of doing so is usually imperceptible.
ICM Mode (Color Mode):
This setting allows you to set the intend method for ICM. The intent
dictates what factor ICM will consider to be the most important when mapping
colors. There are four options:
Intent
ICC Name
Details
Match
Absolute Colorimetric
Maintains the white point. Matches the colors to their
nearest color in the destination gamut.
Graphic
Saturation
Maintains saturation. Used for business charts and
other situations in which dithering is considered undesirable.
Proof
Relative Colorimetric
Maintains colorimetric match. Used for graphic designs
and named colors.
Picture
Perceptual
Maintains contrast. Used for photographs and natural
images. This is the default value.
For more information on color management and ensuring consistent color in your work-flows, see the Color Management section.
Resolution & Anti-aliasing
Digital imaging devices and computer displays are continuous tone devices of fixed resolution; printers, on the other hand, pretend to be, but are not.
A dot on a printed page can only have one of a few (usually four) colors, forcing the printer to emulate continuous tones by combining several dots through dithering techniques.
Resultantly, a printer only produces its full reported resolution when printing mono-tone material such as text.
This is why they say a 200 ppi (pixels per inch) color display is equivalent to a 600 dpi (dots per inch) color print-out for photographic (read continuous tone) material.
I believe it’s more like 1200 dpi (and, it seems I am not alone according to Wikipedia).
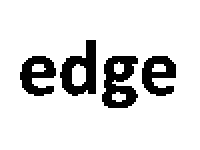
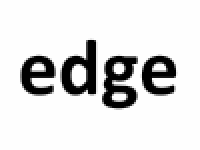
In working with digital images, one of the main concerns is aliasing - the "staircase" effect that appears on diagonal lines.
The brute-force approach to solving this problem is to work at high enough resolutions to make it undetectable.
Experiments show that the human eye can generally not differentiate detail beyond 300 pixels per inch / 118 pixels per cm (on A4 paper, that converts to about 8 mega-pixels).
Given that the monotone resolution of most modern consumer printers exceeds this (600/1200 dpi), but the effective continuous tone resolution falls short
(about 1/6 to 1/12 of the reported figure), it then becomes a complicated balancing act.
The printer has no way of predicting the effective output resolution, so it will ask for one input pixel for each output dot, i.e. the full reported resolution.
Doing so shifts the burden to the printing application, which is then forced to provide more image data than is necessary, most of which ends up not being used.
When working with continuous tone images, the best approach would be to work at between these two extremes, which is to say between a third and a sixth of
the printer’s reported resolution.
For example, to print A4 at 1200 dpi, use 400 ppi at most (about 4096 by 2896 = 12 mega-pixels).
A more elegant solution would be to take advantage of anti-aliasing. You can get a better print-out using half the resolution this way.
You can, for example, do all your work at 3.0 mega-pixel and end up with a print-out that looks better than 6.0 mega-pixel work if you stick to a culture of
anti-aliasing the edges of all cut-outs, text and drawings. Anti-aliasing can improve the appearance of text at lower resolutions
so much that it becomes unnecessary to work at high resolutions.
My recommendation is to use 300 ppi for A4 work that will be printed on a 1200 dpi printer; that translates to an image size of 3508 x 2480 (8.7 mega-pixels).
For photo-printing using premium/glossy A4 photo-paper at 4800 dpi, I recommend using 600 ppi, which gives an image size of 7016 x 4961 (34.8 mega-pixels).
Anything higher than this will usually be over-kill, but Chasys Photo won’t stop you.