This tool allows you to create a path, which you can then use to select, fill and stroke regions.
Paths allow fine-tuning of the selected region even after selection; the path is preserved and saved along with the image so that it can be retrieved later.
Options
Set Points, Elastic Used to define the points making up the path.
Just click the points to set them.
You can change the level setting in the toolbox to harden or soften the corner at the point; 0% will make the point a hard point,
i.e. one with a sharp corner, and higher values will make it more rounded.
This is the default selection mode.
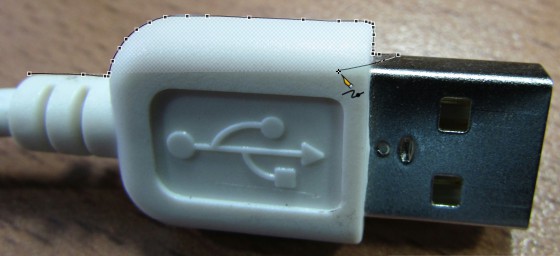
Set Points, Magnetic (Magnetic Lasso) Used to automatically define the points making up the
path.
Click the first point to start. The point automatically snaps to the nearest
edge in the image (within limits). To set other points, just hold the left
mouse button and drag near the edge of interest; the points will
automatically adhere to the edge. Release the mouse button to suspend
selection. Click on a point to force inclusion. Right-click to close the
selection.
The distance between the points is calculated using time and the tool width, among other factors.
This selection mode is similar to Photoshop’s Magnetic Lasso;
it is intended to make selection of objects with high-contrast edges quick and easy by automatically identifying and selecting points on the edge.
Render Path Displays a menu for path rendering options.
Clicking anywhere on the path will bring up a popup menu with options for rendering the path. This menu is similar to the one found under Layer / Edit / Pen and Path Data on the main menu.
Move Path Used to move the entire path as one block.
Click any point on the path then hold and drag to move the entire path around.
Edit Points Used to edit the points making up the
path.
Just click the points to select them. Hold down the left mouse button and drag to move the point. Change the level setting in the toolbox while the point is selected to change its softness.
Insert Points Used to insert new point to an existing path.
Just click where you intend to insert the new point. The level setting in the toolbox determines the softness of the new point.
Delete Points Used to delete the points making up the path.
Just click the points you intend to delete.
The Pen and Path tool is the preferred way of cutting out objects since it allows you to save, retrieve and edit the selection.
When cutting objects out, the operation is done at the sub-pixel level.
Working with Paths
Once you have a path, you can manipulate it through the Path
menu under the Objects menu in the main window;
for example, you can cut out the region, or fill and stroke it.
Path data is attached to a layer as metadata when you save the image, so it is still available even after you close and re-open Chasys Photo.
Options
Stroke
Used to draw lines along the path. The stroke is performed using the current color and current width.
Trace
Used to draw lines along the path using a brush object. The stroke is performed using the current color, current width and current brush object.
Fill
Used to fill the area defined (or not defined) by the path. The fill is done using the current color.
Erase
Used to erase pixels in the area defined (or not defined) by the path. The erased pixels are made transparent.
Copy/Move to New Layer
Used to copy or move the pixels in the area defined by the path into a new layer, thus isolating the object defined by it. If moving pixels, the area previously occupied by the pixels will be erased.
All Path operations are performed at the sub-pixel level and all results are anti-aliased for the highest possible quality.
This can be disabled by unchecking the “Anti-Aliased” option.

 Set Points, Magnetic (Magnetic Lasso)
 Render Path
 Move Path
 Edit Points
