Introduction to Layers
What is a Layer?
Layers can be thought of as transparent sheets of transparent plastic with images drawn on them, that can be stacked on top of each other, so that you can see the lower sheets through the transparent parts of the upper sheets. Layers allow an artist to produce his work in pieces that he can move and edit independently.
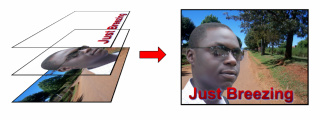
The illustration above shows the concept. The image on the right is made up of the three layers on the left: one with the background at the bottom, followed by one with the portrait, and finally, one with the text at the top. Layers make it very easy to create relatively complex imagery. An additional advantage is that they also make it easier to re-edit saved work, as the layer that needs adjustment may be removed and edited separately.
What is a Free-style Layer?
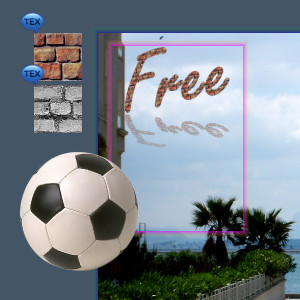 |
A free-style layer is one that can be positioned anywhere, including totally removing it from the image and keeping it aside; in which case it remains visible and fully accessible. Chasys Photo Editor provides free-style layering to make it possible for you to work with images the same way they would if the images were photos placed on your desk - you may stack what you need together, while placing pieces that you are not currently using outside the stack but within reach. The concept of free-style layers might be a bit confusing to users who have been working with other editors (and are therefore not used to being able to see off-screen layers), but I believe that it enhances productivity for existing users and improve the learning curve for those who are new to image editing. Free-style layers allow you to work the way you want; to work efficiently and freely, and by your own terms. To make things easier for you, Chasys Photo has an image mode that simulates the behaviour of traditional image editors, namely Composite / Clipped. In this mode, layers (or parts thereof) that are outside the canvas are partially clipped to give a user experience that is similar to the aforementioned traditional editors.
|
Image Modes and Blend Modes
The rendering (drawing) of layers in Chasys Photo Editor is dictated by two parameters, the image-mode and the blending-mode.
The image mode, which is a concept that is unique the Chasys Photo, dictates how it interprets the layers; for example, in the “frame animation” image mode, layers are interpreted as video frames and in the “image list” image mode, they are interpreted and separate pages or copies with different resolutions. Some layer attributes may be unavailable when using certain image modes. This is by design; not all attributes make sense in all image modes.
The blending mode determines how the layers interact with each other when using one of the “composite” or “object animation” image modes. Blending modes are not unique to Chasys Photo; many other image editors has a similar concept. Chasys Photo supports more than 28 blending modes, including a custom mode that allows the definition of new blending mode and/or the importation of blending modes from other image editors. Chasys Photo comes pre-packaged with some unique blending modes from Photoshop, GIMP and Paint.NET.
Layer Properties

|
Layers have properties/attributes that determine their behavior. The most basic is the position, which just sets the layer’s position relative to the rest of the image. Note that you can enter math equations instead of actual values, for example 32+(3*24). The z-order determines which layer is on top of which one. The layer with the highest z-order is placed on top of the stack, and the one with the lowest z-order is placed at the bottom and treated as the background. Layers can be prevented from moving (relative to the background) by applying the locked attribute, and they can be made invisible by applying the hidden attribute. Layers can also be excluded from the final work without making them transparent, this is done using the excluded attribute. The transparency attribute, which is configurable as either a factor of 255 or as a percentage, sets the global alpha for the layer; per-pixel transparency values are blended with the global alpha when the layer is being rendered. A layer can be part of a group, as explained below. Shown on the left above above is the layer properties window, which allows you to set these properties and more. The layer properties is a floating toolbar; you can keep it open as you work and it will automatically track any changes you make. The table below lists the common layer options and what they mean:
Below these is a context-controlled edit button, and finally the metadata area, which allows you to set some common layer attachments (see below). |
Layer Attachments (metadata)
Most image editors provide long lists of layer properties that can be edited by the user. As these programs become more complex, more properties are added, with some only applicable to specific usage scenarios, leading to a long and complex web of properties for each layer. That’s messy.
Chasys Photo solves this problem in a very simple way. All layers have a small set of properties that are applicable for most usage scenarios, as shown above. For more specific use, the layers allow – yes, you guessed it – the addition of an attachment (or metadata), much like the attachments you use with e-mail. This information is saved along with the layer and is treated as part and parcel of the layer; it is always preserved when the layer is saved, copied, moved, etc. If the layer were to be opened for editing later, this information will be restored and used together with the other layer properties.
Consider, for example, a text layer. Such a layer will have the normal properties like hidden, locked and blending modes, plus a TEXT attachment. The TEXT attachment, usually just a few KB of data at most, will hold all the information relevant for text, including the data needed to regenerate it (e.g. fonts used, angle, the actual text, colors, styles), thus making it fully re-editable.
As a plus, plug-ins are allowed to add, read and edit attachments – basically making layer properties dynamic and extensible. An example of this is the way the Icon and Cursor plug-in uses the hotspot attachment to specify the cursor’s hotspot, while the JPEG plug-in uses the mark-up attachment to store EXIF data on a per-layer basis in a way that is directly user-editable within Chasys Photo. Most plug-ins will also interact with the PPI (DPI) of an image to control the printed size via the PHYS (Physical Dimensions) attachment.
Attachments can be in various formats; each format is identified by a four letter code, e.g. PATH or NOTE. The four letter code is case sensitive, but you don’t need to worry about this because it’s handled internally.
Each layer can have several attachments. Most are added automatically by the tools you use, for example, the Pen and Path tool uses PATH, while the Text tool adds TEXT. Some are used by objects and plug-ins, for instance, the MARK (mark-up) attachment is used by the brush object to store brush attributes and by the cursor load/save modules store hotspot and color-depth information, while BLND is added by the Photoshop PSD file plug-in to add support for Photoshop-specific blending modes.
Attachments can even by used to link plug-ins, as is the case with the QR Code Generator plug-in and its use of the APPL attachment. Whenever you use the QR Code Generator to build a QR Code, it adds an APPL attachment that instructs Chasys Photo to open it when you double-click the QR Code, thus making it fully re-editable in a very intuitive fashion
Of particular importance is the mark-up attachment (type MARK), a list of variables in plain text that is user-editable via the Mark-up window. An example of this is the image.bpp tag used to indicate that a layer’s preferred bit-depth; setting this to 8 will cause the layer to be re-sampled to 256 colors by a plug-in that supports that function. A typical mark-up would look like this:
image.bpp=32; |
When saved as a cursor, this instructs the cursor module store the image as a full-color image with a full alpha channel (Vista-style cursors and icons), and if stored in a format that supports EXIF, to set the relevant tags as indicated. As mentioned above, mark-ups can be added and removed using the Mark-up window. For a more in-depth discussion of MARK, see the article on Mark-up Attachments.
Adjustment Layers
An adjustment layer is a special layer used to perform non-destructive editing by applying adjustments to your image without permanently changing pixel values. For example, rather than making a Curves adjustment directly to an image, you can create an adjustment layer and make the Curves adjustment to that instead. The adjustments are stored in the adjustment layer and apply to all the layers below it; you can correct multiple layers by making a single adjustment, rather than adjusting each layer separately. You can change or discard the adjustments at any time.
Layer Groups
Layers in Chasys Photo can be grouped together. This locks their positions relative to one another, such that the Move Tool moves them as a group. Layer groups can also be exported and copy-pasted via the system clipboard. Each group is identified by a number ranging from 1 to 255. Unlike other editors, Chasys Photo does not require group members to follow each other in the overall z-order of layers – group members may occupy any position in the list of layers.
Layer groups may be created either manually be specifying group membership in layer properties or by selecting each memebr using the aforementioned hand tool while holding down the Ctrl key on the keyboard.