Camera RAW
The insides of a camera...
At the heart of your camera is a little chip, known as the sensor. This sensor is the "eye" of your camera. The lens system basically focuses an image onto this chip, and the chip captures the image and converts it into electronic form. The chip achieves this task as follows: the chip has an array of sensors, each capable of detecting the intensity of light falling on it. This is known as the light sensor matrix, usually a Charge-Coupled Device or CMOS sensor. The sensor matrix usually has a color filter array over it (an exception to this rule are cameras based on Foveon X3 or 3CCD). The most popular pattern is the Bayer mask though other patterns are also used (e.g. the RGBE mask). In the Bayer mask, each square of four pixels has one filtered red, one blue, and two green (the human eye is more sensitive to green than either red or blue). The result of this is that luminance information is collected at every pixel, but the color resolution is lower than the luminance resolution.
 |
 |
Bayer Filter Matrix |
RGBE Filter Matrix |
To generate an image from this data, a significant amount of signal processing is required (human eyes and electronics "see" differently). The data needs to be amplified. The data is then de-mosaiced (conversion from the bayer pattern to the RGB pixels we are used to). Things like color balance, saturation, noise reduction, etc. are then performed by the processor and software built into the camera.
What is a RAW file?
A camera RAW file is an image file that contains unprocessed or minimally processed data from the image sensor of a digital camera. In contrast, a JPEG file, as produced by a digital camera, usually undergoes a lot of processing before being saved: color-balancing, de-mosaicing, interpolation, de-noising, gamma adjustment, etc, plus a significant amount of lossy compression. Raw image files are sometimes called digital negatives, because, like negatives in film photography, they are not directly usable as images (they are not yet processed), but have all of the information needed to create images. For this reason, the process of creating an image from a raw file is sometimes referred to as "developing" a raw image.
When you take a snap with your camera, a lot of things are done from the moment the sensor picks up the light from the scene. The process goes like this:
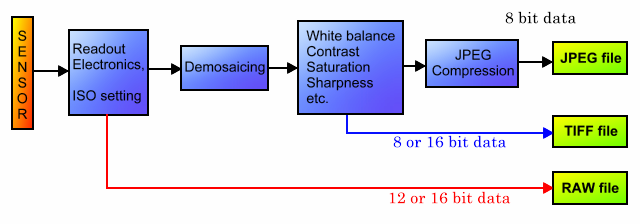
RAW data is the output from each of the photosites of the image sensor, after being read out of the array by the array electronics and passed through an analog to digital converter. The readout electronics collect and amplify the sensor data and it’s at this point that "ISO" (relative sensor speed) is set. If readout is done with little amplification, that corresponds to a low ISO (say ISO 100), while if the data is read out with a lot of amplification, that corresponds to a high ISO setting (say ISO 3200). Now, one of two things can be done with the RAW data. It can be stored on the memory card, or it can be further processed to yield a TIFF or JPEG image. If the data is stored on the card as is, we refer to that file as the raw image.
Technically speaking, there is no such thing as a "raw image format". Different manufacturers use their own proprietary and typically undocumented formats, which are collectively known as raw format. Often, the format also changes from one camera model to the next. Several major camera manufacturers encrypt portions of the file in an attempt to prevent third-party tools from accessing them. As a result, there exist several hundred raw formats, and new ones keep coming out.
Why use RAW?
Like a photographic negative, a raw digital image usually has a wider dynamic range and color gamut than the eventual final image format, and it preserves most of the information of the captured image. The raw image’s purpose is to save, with minimum loss of information, the data that are obtained from the sensor, and the conditions surrounding the capturing of that data, known as the metadata.
Typically, a digital camera processes the image from the sensor into a JPEG file using settings for white balance, contrast, etc. that are either selected automatically or entered by the photographer before taking the picture. Cameras that produce raw files save these settings in the file, but don’t perform the processing. This then gives the photographer the flexibility to experiment with these settings on a computer after taking the shot, and with greater flexibility. For example, the white point can be set to any value, not just discrete preset values like "daylight" or "indoor", and steps such as noise reduction or sharpening may be skipped. In other words, you, not the camera, make the decisions on how the image should be processed.
The computing power available in a digital camera is severely limited in comparison to what is available in a computer. The tasks needed to create a final image from the sensor data are quite complex; as a result, compromises are made inside the camera. Transferring these tasks to the computer makes it possible to use better, more compute-intensive methods, improving image quality. For example, the user may choose to use a different demosaicing algorithm other than the one coded into the camera.
JPEG images are typically saved using a lossy compression format (leading to quantization and compression artifacts), and use gamma-compressed 8-bit values to store that data. Raw formats are typically either uncompressed or use lossless compression, and typically have 12 or 14 bits of intensity information. Putting the 12 bit data in a 8 bit file is like pouring a 3 liters of liquid into a 2 litre container. It won't all fit so you have to throw some away. Since the data is not yet rendered and clipped to a color space gamut, more precision may be available in highlights, shadows, and saturated colors. The greater precision also means that large transformations, such as increasing the exposure of a dramatically under-exposed photo, result in less visible artifacts when done from raw data than when done from already rendered image files. As a result, the maximum amount of image detail is always kept within the raw file.
Using RAW Images
The Camera RAW plug-in bundled with Chasys Photo allows you use RAW images like you would any other image, except that it allows to do the processing required to generate an image from the raw data on your computer instead of doing it in the camera. Since it’s on a PC, you can pick whatever white balance, contrast, saturation, sharpness etc. you want. Camera RAW does all the processing in a blend of floating point and 48 bit RGB (16 bits per channel) to get the highest possible quality.
When you open an image using Camera RAW, it shows you a dialog box where you can fine-tune the processes involved in turning a RAW file into a usable picture. It’s important to remember that the data collected from the sensor in your camera undergoes many processes before it can be used as a normal image, and a RAW file’s contents are unprocessed data. This dialog box allows you to control these processes.
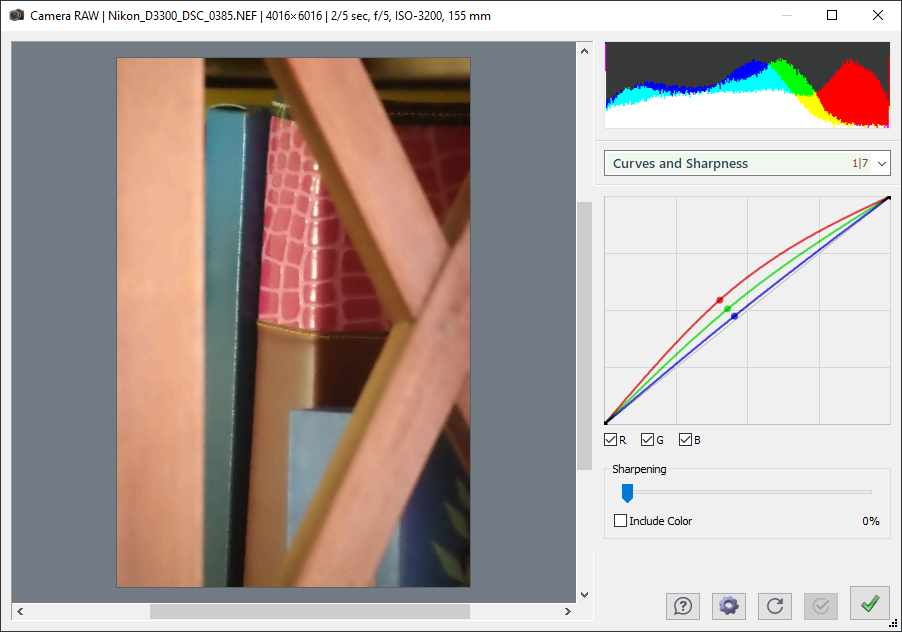
The dialog box has several pages of settings; you can switch between these by using the drop-down selection at the top of the dialog box (see illustration below). At the bottom of the window, we have 5 buttons for Help, Settings, Reset, Apply/Preview and Done, in that order:
 |
 |
Curves and Sharpness
Curves adjustment in Camera RAW is designed to resemble the one in Chasys Photo Editor, with the exception that it operates on data at a higher precision. Curves can be used to adjust the colors of an image with a very high degree of control. It allows you to freely fine tune the intensity of every shade by adjusting the transfer function, which is represented as a graph of output value against input value. Unlike the other adjustments, curves can be used to freely adjust exactly how bright each shade of intensity in an image can be, in particular, it can be used to highlight or dim only certain ranges of intensity present in an image in a way that the others can’t. You adjust the graph using control points on a graph. Control points are added by clicking anywhere that there currently is no control point, and may be removed by right-clicking on the desired control point. To move a control point, simply click and drag it to a new location.
The Sharpness adjustment sharpens the image; by default, it only sharpens the luminosity to give results that are more aesthetically pleasant. If you wish, you can make it sharpen both luminosity and chromaticity by selecting the “Include Color” option.
Temperature and Tint
Temperature and Tint adjustment in Camera RAW is designed to resemble the one in Chasys Photo Editor, with the exception that it operates on data at a higher precision. This adjustment changes the color temperature and tint of image to either make it warmer or cooler or shade it towards fuchsia or green with a very high degree of control.
White Balance (Camera)
White balance is the global adjustment of the intensities of the primary colors (red, green, and blue) to render colors – particularly neutral colors – correctly; it changes the overall mixture of colors in an image and is used for color correction. This is essential because sensors do not match the sensors in the human eye, and the ambient viewing conditions of the acquisition differ from the display viewing conditions. Cameras normally give you discrete settings, such as “Daylight” or “Indoors”. You can use these if you want, alternatively, you can use the automatic setting or even apply your own custom preferences.
White balance works by modifying how the raw data obtained from the camera sensor is interpretated, and is therefore a basic processing step.
Interpolation Quality
This setting allows you to control the quality of the interpolation done on the RAW image:
| Value | Meaning |
|---|---|
| q0 | Use high-speed, low-quality bilinear interpolation. |
| q1 | Use Variable Number of Gradients (VNG) interpolation. |
| q2 | Use Patterned Pixel Grouping (PPG) interpolation. |
| q3 | Use Adaptive Homogeneity-Directed (AHD) interpolation. |
Highlights
This option allows you to specify how highlights are handled:
| Value | Meaning |
|---|---|
| 0 | Clip all highlights to solid white. This is the default. |
| 1 | Leave highlights unclipped in various shades of pink. Not recommended. |
| 2 | Blend clipped and unclipped values together for a gradual fade to white. |
| 3 - 9 | Reconstruct highlights. Low numbers favor whites; high numbers favor colors. Try level 5 as a compromise. If that’s not good enough, do level 9, cut out the non-white highlights, and paste them into an image generated with level 3. |
Gamma
This setting allows you to control the way gamma correction is applied.
Thresholds
This sets the lower and upper thresholds for raw pixel data. The low threshold is used for wavelets to erase noise while preserving real detail; the best threshold should be somewhere between 100 and 1000.
Processing Options
These options control details of RAW processing, such as correcting aberration.
Dead Pixels
This option allows you to specify a list of dead pixels to be skipped over by the interpolator when the image is being generated.
Dark Frame
This option allows you to specify a "dark frame" to be subtracted from the raw data for the purpose of noise reduction. To generate a dark frame, shoot a raw photo with no light.